
| FR Code | Name | Description | Acceptance Criteria |
|---|---|---|---|
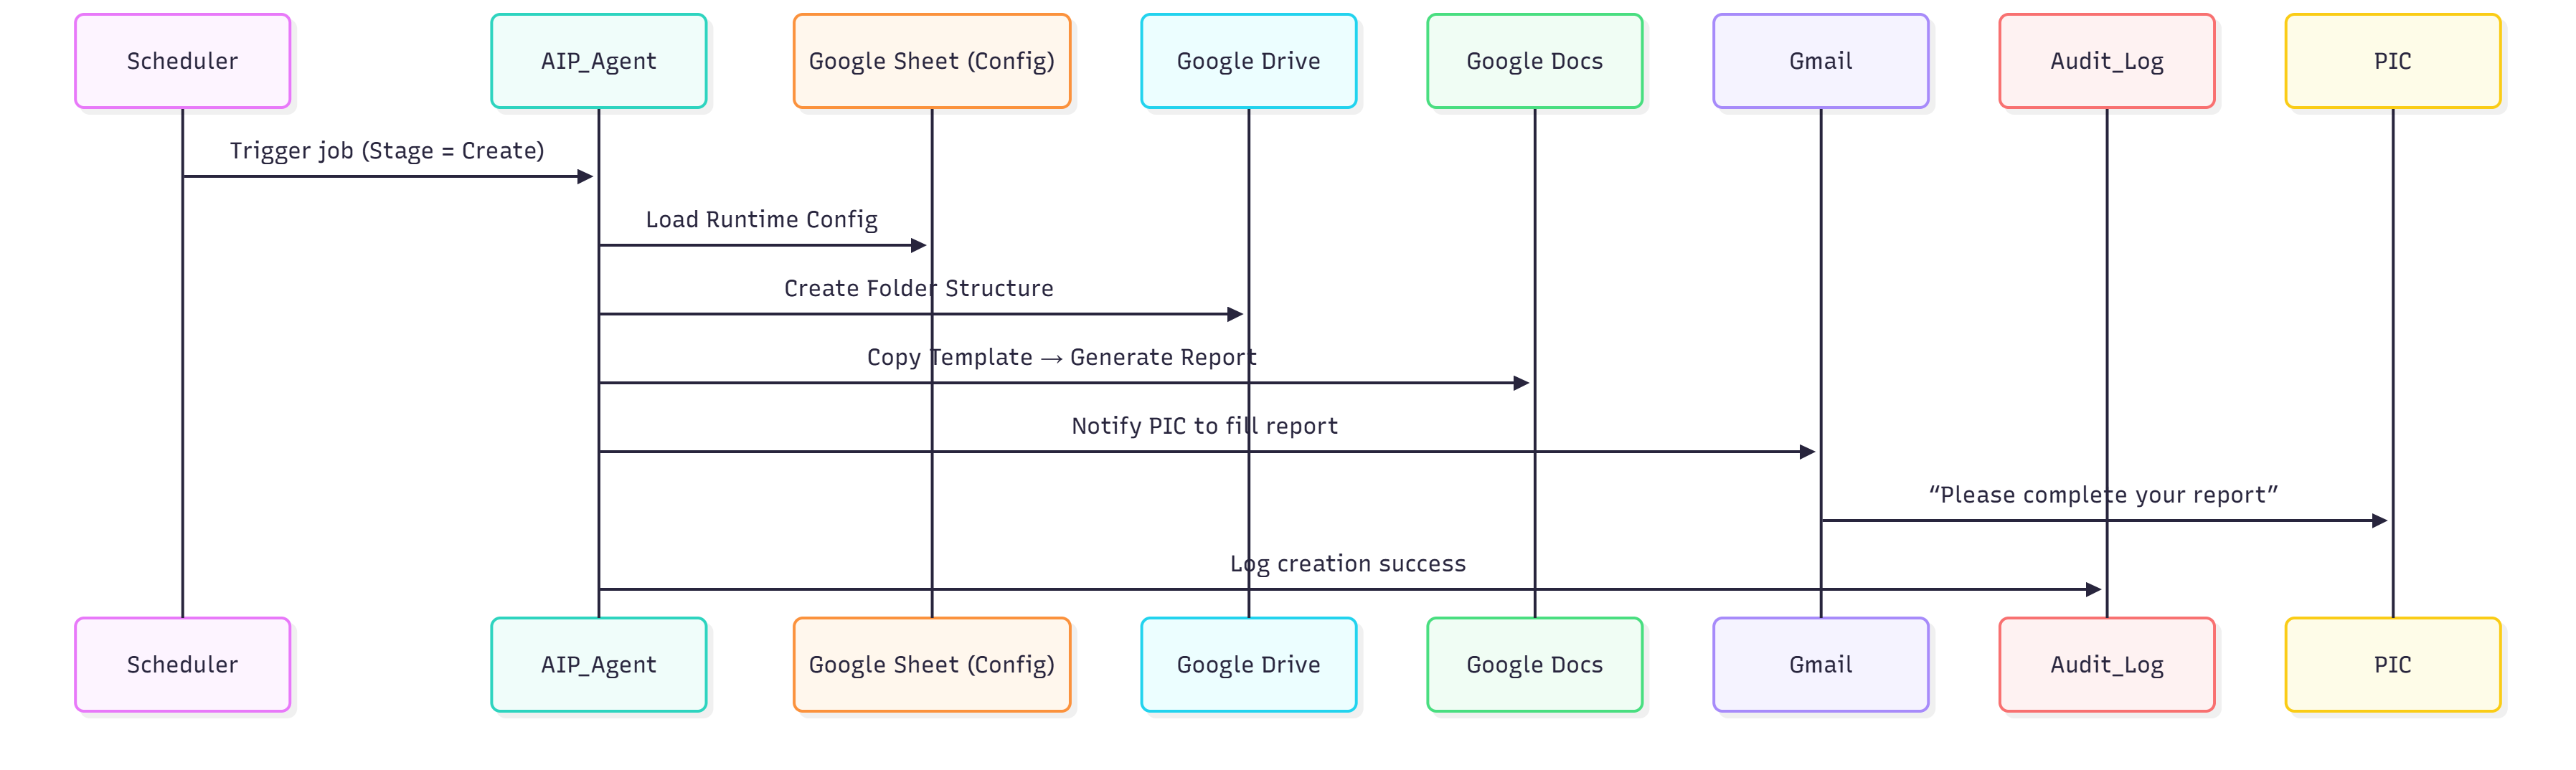
| FR-001 | Agent Creation | Allow creation of new report agents from spreadsheet configuration | New agents created per row entry |
| FR-002 | Template Copy | Generate report documents from predefined templates | Generated file matches template and naming rule |
| FR-003 | Reminder Trigger | Send reminders to PICs before deadline | Reminder email sent on schedule |
| FR-004 | Delivery Mechanism | Auto-deliver final reports to recipients | Reports delivered successfully |
| FR-005 | Audit Logging | Log all scheduled runs and delivery status. | Logs retrievable for review and compliance. |
.png?alt=media&token=dffc8414-be07-4649-b549-a8b50bba238b)
 ```mermaid
graph TD
A[Report Agent] --> B[Create Weekly Report Tool]
A --> D[Reminder Weekly Report Tool]
A --> C[Share Weekly Report Tool]
```
#### 3.2 Agent Creation Best Practices
**✅ Do’s**
* Map the end-to-end flow before building.
* Keep each agent focused on a single intent.
* Define tool contracts and example I/O before prompt tuning.
* Test tools and sub-agents before testing the coordinator.
**🚫 Don’ts**
* Don’t start without a mapped flow.
* Don’t combine multiple intents in one agent.
* Don’t tune prompts before tool definitions.
* Don’t test the coordinator first.
Use **Google Drawings** to make it collaborative and gather feedback efficiently.
Example Agent Diagram that use Google Drawings can refer to [this](https://docs.google.com/drawings/d/1HEp-w-u2ioixLftyM8d7h3IY0ewkzJx1vtuSfLUlSkw/edit).
{% hint style="warning" %}
**Note**: Always begin with a **single agent using multiple tools**. \
Introduce sub-agents only for complex tasks — but remember they add latency since each sub-agent runs its own reasoning cycle.
{% endhint %}
{% endstep %}
{% step %}
### Step 4 — Define Test Case Scenarios (TDD Approach)
#### 4.1 Purpose
Test cases act as **guards** to ensure agents fulfill business requirements and behave consistently.
#### 4.2 Recommended Spreadsheet Format
Kindly refer to this [spreadsheet](https://docs.google.com/spreadsheets/d/1NfZZX-l83_6llhGpvVSzkTupt5TlfUVbwzVuXfK-SI0/edit?gid=412093730#gid=412093730) as an example.
#### 4.3 Assertion Checklist
* ✅ Expected Tools + Parameters verified
* ✅ Output validation matches expected result
* ✅ Cross-check the process (input → output) with flow chart diagram
* ✅ Cross-check tool usage with agent diagram
#### 4.4 Collaboration Tip
Document test cases in a shared spreadsheet and update them whenever logic changes.
```mermaid
graph TD
A[Report Agent] --> B[Create Weekly Report Tool]
A --> D[Reminder Weekly Report Tool]
A --> C[Share Weekly Report Tool]
```
#### 3.2 Agent Creation Best Practices
**✅ Do’s**
* Map the end-to-end flow before building.
* Keep each agent focused on a single intent.
* Define tool contracts and example I/O before prompt tuning.
* Test tools and sub-agents before testing the coordinator.
**🚫 Don’ts**
* Don’t start without a mapped flow.
* Don’t combine multiple intents in one agent.
* Don’t tune prompts before tool definitions.
* Don’t test the coordinator first.
Use **Google Drawings** to make it collaborative and gather feedback efficiently.
Example Agent Diagram that use Google Drawings can refer to [this](https://docs.google.com/drawings/d/1HEp-w-u2ioixLftyM8d7h3IY0ewkzJx1vtuSfLUlSkw/edit).
{% hint style="warning" %}
**Note**: Always begin with a **single agent using multiple tools**. \
Introduce sub-agents only for complex tasks — but remember they add latency since each sub-agent runs its own reasoning cycle.
{% endhint %}
{% endstep %}
{% step %}
### Step 4 — Define Test Case Scenarios (TDD Approach)
#### 4.1 Purpose
Test cases act as **guards** to ensure agents fulfill business requirements and behave consistently.
#### 4.2 Recommended Spreadsheet Format
Kindly refer to this [spreadsheet](https://docs.google.com/spreadsheets/d/1NfZZX-l83_6llhGpvVSzkTupt5TlfUVbwzVuXfK-SI0/edit?gid=412093730#gid=412093730) as an example.
#### 4.3 Assertion Checklist
* ✅ Expected Tools + Parameters verified
* ✅ Output validation matches expected result
* ✅ Cross-check the process (input → output) with flow chart diagram
* ✅ Cross-check tool usage with agent diagram
#### 4.4 Collaboration Tip
Document test cases in a shared spreadsheet and update them whenever logic changes.